Working in a Windows Domain environment, whether it is in the larger campus size enterprise environments or the small medium business markets, it is likely you will come across Remote Desktop Services. Remote Desktop Services rely on having a valid certificate being used by all the services on all servers, or to have a self-signed certificate that is pushed to all workstations that will be used so the connection is trusted. If the Remote Desktop Services are only utilized with internal infrastructure, then using a Windows Certificate Authority may be the best option, but as more and more employees start to work remotely to connect in a signed certificate from a globally trusted platform like Entrust, Thawte, DigiCert or GoDaddy will need to be purchased. This hammer is not geared towards code or automation, so do not expect script blocks or code to follow.
Many monitoring services available are not designed to monitor the certificate being used on many Windows services, and unfortunately many certificates are only purchased or signed for a year so every year there is a half day or more where Remove Desktop Services become unavailable until a new certificate is put in place. Whether you let the certificate lapse or you are the proactive Server or Systems Administrator you are, the same process applies. There are currently no pictures, if that is what you were hoping for. With enough requests we will update this post with some imagery generated by the fine Techs with their Hammers. This hammer is geared more to a server admin with at least some experience maintaining a Windows environment as a tier 1 help desk analyst should not be
Here at Tech With a Hammer we are geared to the small and medium business size markets, and as such many business either will not have the resources available or no need to have an on-premises Windows Certificate Authority so we will be covering the signing SSL signing process at online Certificate Authorities with a generated Certificate Signing Request, and how to utilize this certificate in Microsoft Remote Desktop Services. The To re-iterate, the process is the same for a new or renewed certificate.
For a Globally Trusted Certificate Authority
For this example, GoDaddy will be used as much of our work is aimed at the small-medium business markets so they will not be willing to buy spend 4x the money or more at Thawte or Entrust. The process is similar, though where they need you to verify ownership of the domain the process will be slightly different though each certificate authority has clearly defined processes in place and how to documentation which we would highly recommend following as that process can and will change after this post is published to the Internet.
In GoDaddy, when you purchase an SSL certificate it is not assigned to a domain or keyed at the time of purchase. This is all done after the initial purchase is created. So, purchase your new certificate, whether it is a new or renew it is the same process. Once purchased you will need to generate a Certificate Signing Request.
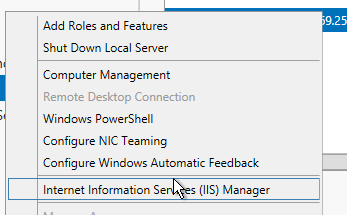
To generate the Certificate Signing Request multiple tools can be used, OpenSSL being open source and used almost everywhere, Certificate Management Console built into all Windows operating systems, or the easiest being Internet Information Services which is installed with the Remote Desktop Services role set on your server. This hammer will cover the process through IIS due to easy of use for single name certificates, though if requiring additional names as subjectAltNames then either OpenSSL or the Certificate Management Console will be needed.
On the Remote Desktop Service server running the Connection Broker service open up the IIS Management console, under the page for the server name select Server Certificates and then under actions click on Create Certificate Request. The common name, or subject name, is the FQDN of the domain name used to connect. Common domains are remote.domain.tld, secure.domain.tld, service.domain.tld, while you can have your user connect to hammer.domain.tld or whaleblubber.domain.tld if you want to practice security by obscurity (as everyone knows security by obscurity works). For all information be as accurate as possible, if you are renewing a cert that has been issued stick with the same information used for all other parts as the old cert unless they need to be updated.


We have used the information in the figure below for this post only, so all details pertaining can be safely ignored but enter in the information as accurately as possible.
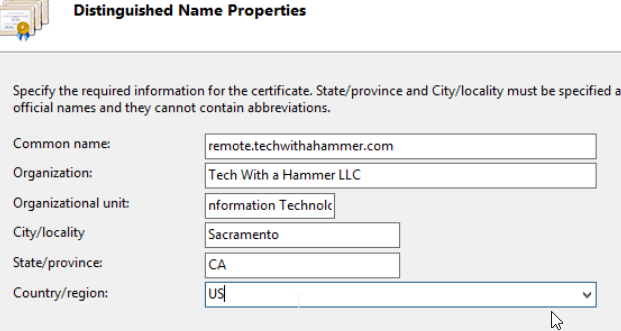
The Country needs to be in two letter international format, you may need to look up your country code if you do not know it.
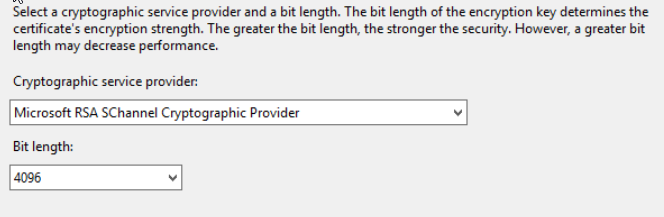
Upon clicking next you will notice you have a few options with your algorithm and key size, we here at Tech With a Hammer would recommend choosing elliptical duffie-hillman with a keysize of at least 4096 bits, but unfortunately Microsoft services do not work with the elliptical keys yet so sticking with Microsoft RSA is sufficient. We have found that there have been compatibility issues when selecting anything higher than 4096 bit key length, some online certificate authorities are unable to accept anything larger, as well some older software or operating systems are unable to use keys larger than 4096; though we have questions as why you would be still letting Windows XP without a service pack installed connect to your network.
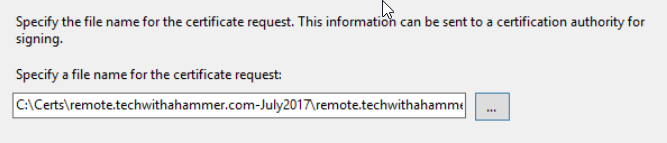
To finish off the CSR process you will need to save the request to a text file, save this request to a secure location on your server, the larger the keysize the longer it will take to generate the request. It is highly recommended that this folder is not on a network share, with the default NTFS ACLs adjusted so only the user account being used to maintain the certificates can access the folder. The contents of the file will be used to sign the certificate from your online Certificate Authority. If you look at the file you will notice it is just a couple of flags to denote beginning and end of the certificate, and then a blob ob base64 encoded text, should look similar to the following blob.
|
1 2 3 4 5 6 7 8 9 10 11 12 |
-----BEGIN NEW CERTIFICATE REQUEST----- MIIGjTCCBHUCAQAwgZcxCzAJBgNVBAYTAlVTMQswCQYDVQQIDAJDQTETMBEGA1UE BwwKU2FjcmFtZW50bzEfMB0GA1UECgwWVGVjaCBXaXRoIGEgSGFtbWVyIExMQzEg MB4GA1UECwwXbmZvcm1hdGlvbiBUZWNobm9sb2dpZXMxIzAhBgNVBAMMGnJlbW90 ................................................................ QAJFgYZ7NULfrTovnns7WLJFoSbLekb0BU1JajypOcqaOve6Af51CCyL+J46BtXI HYf/GuCeo2Xuq6DXX77ZZ+yMZurv7sMxVLkjvyXc9Pj3dco5Vd6L6pJYakQSp6NY hWdypokKWK/5lIIXbQyEQLC4G5eUAI3hIBSRfTl8dyZfRb7V2E0vNJaLQm/LSIQg 3Q== -----END NEW CERTIFICATE REQUEST----- |
Now, go into your online Certificate Authority and select the new certificate you purchased, from here you will have the option to Key the certificate. You will need to copy this certificate request into the prompt for the request file, or you will need to upload the request file. The request file can have any file extension, but many online Certificate Authorities will only accept this file with a .req or a .txt extension.
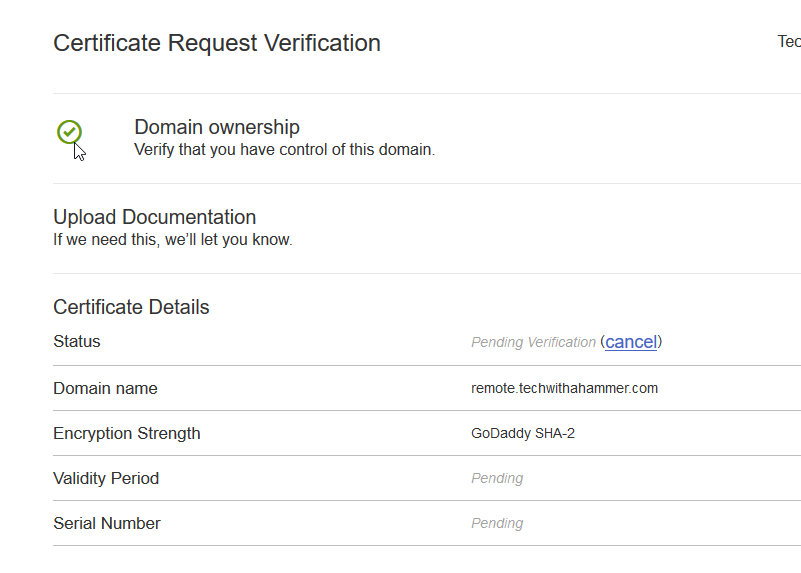
When keying the certificate you will need to verify you own the domain and have access to maintain the DNS or webhost portion, GoDaddy gives you both options to verify. Either create a file named with a specific random string in the root of the domain http://remote.domain.tld or create a TXT or A record following the how-to documentation provided by GoDaddy. As this process changes, with the type and name of record, we will not cover that here so please use your intuition when verifying your domain with your Certificate Authority. When verifying the domain it can take a few minutes to a day or two depending on the tasks they need you to perform. The more common the domain they may request you provide documentation stating you purchased and own the domain and not just have control over the DNS.
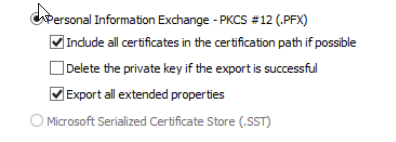
In the GoDaddy page it gives you several download options, the certificate you use to complete the signing request can be downloaded in any format, but for consistency sake select the IIS option in the drop down list and download the zip. The randomly named zip is based on the thumbprint of the crt in the zip, but is only needed to finalize the signing request. Store this zip in the same secure location as listed above, it can’t be used without the signing request but when combined a new cert can be generated just about anywhere so keep both of these files secure. It may not be required, but recommended that you install the intermediate certificate provided with the crt in that zip, as when you export the cert with the private key to be used in RDS it is recommended you export the whole chain.

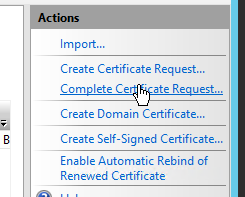
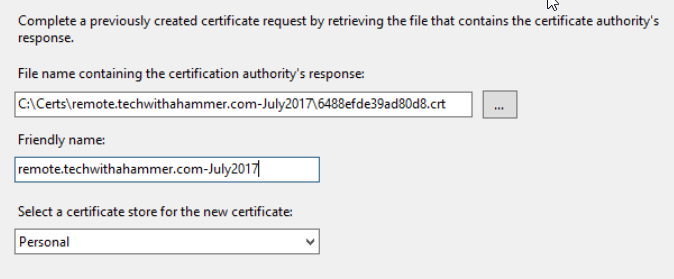
Open the IIS Management Console, if you did not leave it open during this process. In the Server Certificates portion of the console under action click on Complete Certificate Request and provide it the crt from that zip you downloaded in the previous step. During this process of completing the signing request, you have the option to mark the private exportable or not, make sure you select yes otherwise you will experience some headaches in the next step when trying to export it. Upon completion you will see a new certificate show up in IIS. From here you will need the Certificate Management Console as you are unable to export the private key using IIS.
Once the certificate signing request has been completed you should now see a cert, or another cert, show up in your IIS Management Console
Export the Key with the Private Key
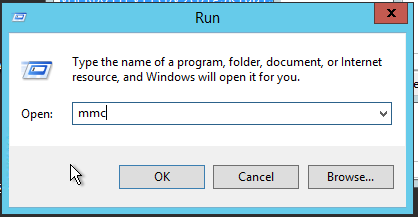
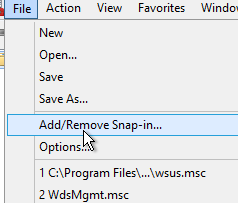
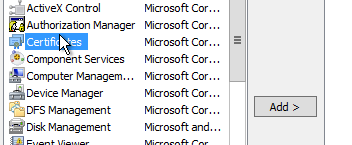
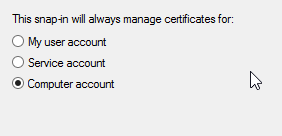
So, open up the Microsoft Management Console, add the Certificates snap-in and chose the Computer Account.
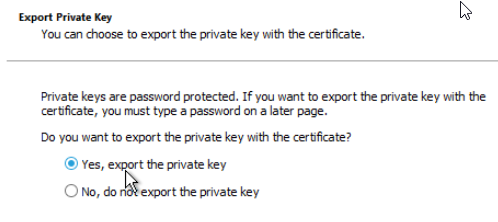
Under Personal you should see the new certificate generated, select it and under All Tasks and Export. Choose Yes to export the private key, and then include the certificate chain and all extended properties.
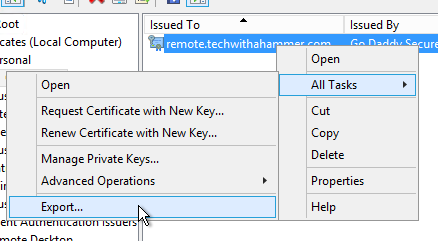
If you are processing this certificate on a web server that is not associated with your Remote Desktop Services server make sure you choose the option to also delete the key from the store, otherwise you can leave it in place as it will be re-imported. In this case since our tech was hammering away on the RDS server he chose to not remove it from the certificate store.
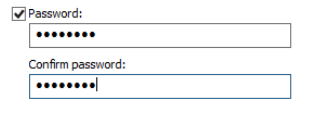
To be able to export the private key, Windows assumes that your server administrator is incompetent and will require you to secure the certificate by either locking it to a security principal (user account, computer account, or security group), or by locking it with a password. Our tech with the hammer is suggesting to use a password as he has had terrible experiences locking the certificate to either a username or a group, though your mileage may vary as his last experience with this is from Windows Server 2003.
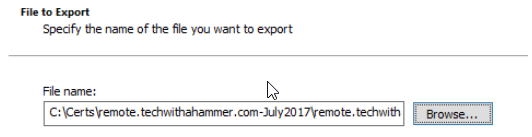
Save this PFX file to the same secure location as above, having this PFX is just as dangerous as having the CSR and CRT together, though it allows any attacker to skip a step if they want to abuse it.
On any server running any of the RDS services, open up the Server Manager console. If you have more than one RDS you will need to add all your servers to the console, otherwise when you import the certificate it will not be applied to all RDS servers.
Open up the RDS role, and under Overview click on Tasks and then Edit Deployment Properties.

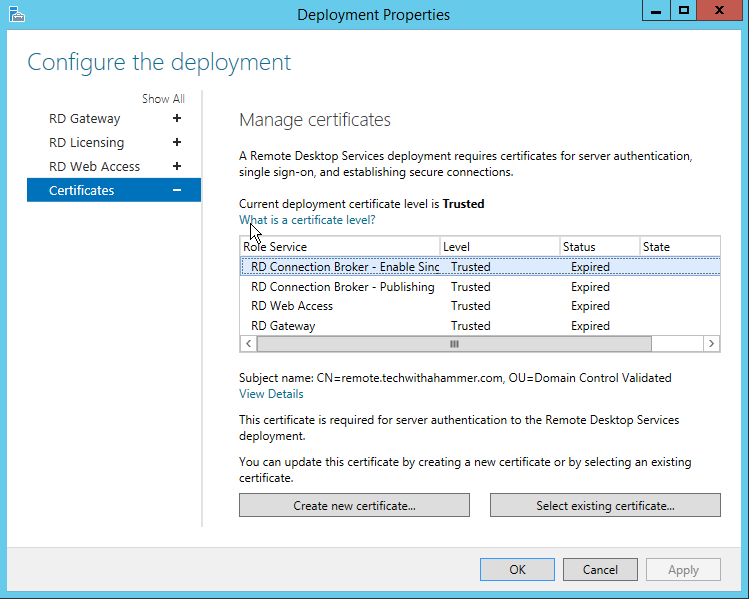
Start from the service listed at the top, choose the option to select an existing cert, browse to the PFX exported in the previous step, ensure that the option to allow the certificate to be added to the trusted root store is selected, and then make sure to apply.
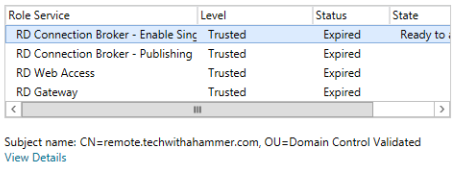
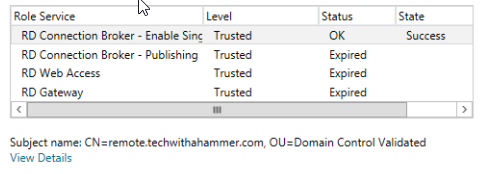
You can only edit the cert on a single service at a time, so this part will take some time as it can take a few minutes to push the cert to all servers.

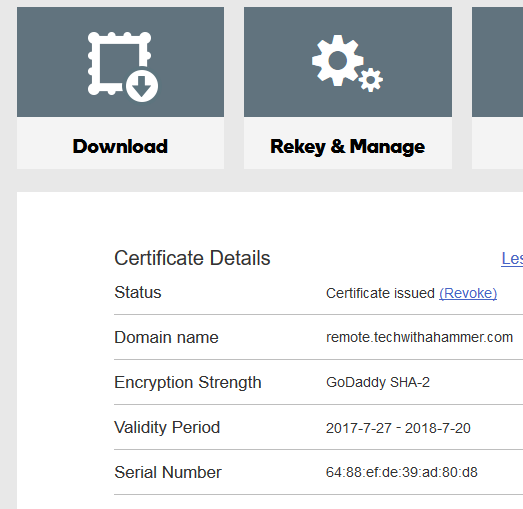
And, this hammer has covered obtaining a new or renewing a certificate for your Microsoft Remote Desktop Services. We hope this guide has helped clear up some of the headaches you would experience when dealing with certificates on Remote Desktop Services.
Hi, I just wanted to let you know this was extremely helpful and I was able to go through this complicated RDS cert renewal process with ease, thanks to this guide. I took this over after the previous, more experienced engineer who used to handle it was terminated from my company, and my only memories of this process from last time were lots of swearing and (apparently) a resolution that wasn’t even correct. No documentation, until now! Thanks again.
Great article, thank you!